Trusting Keys
In part 1, we downloaded our friend's public key from a key server and verified it by comparing the fingerprint in person. That was enough to get us started and let us send encrypted emails, but it left some things to be desired. It is still somewhat cumbersome; it would be nice not to have to verify every key in person. For instance, it would be very helpful if we could trust all of the keys that our friends have verified, so that we could help each other out with the task of verifying keys. As long as it has been verified by someone I trust, I should be able to trust the key. It turns out there is a way to do exactly this.Obviously, this requires a way to indicate that you have verified a key, and who you trust to verify keys for you. We not only need to indicate that a key was verified for our own use, we need to communicate this to our friends in such a way that they can be assured it was you, and not an imposter, who verified the key. We have already seen a way of doing this. Remember that signing an email allows your friends to verify that it came from you? Similarly, we can sign keys to indicate that we have verified them. Rather than sending an email, we upload the signed key to a key server. This way, when your friends retrieve a key from the key server, they will also get your signature and automatically know that you have verified that the key belongs to the correct person. Now, they won't have to meet with that person to verify the key, the work is already done!
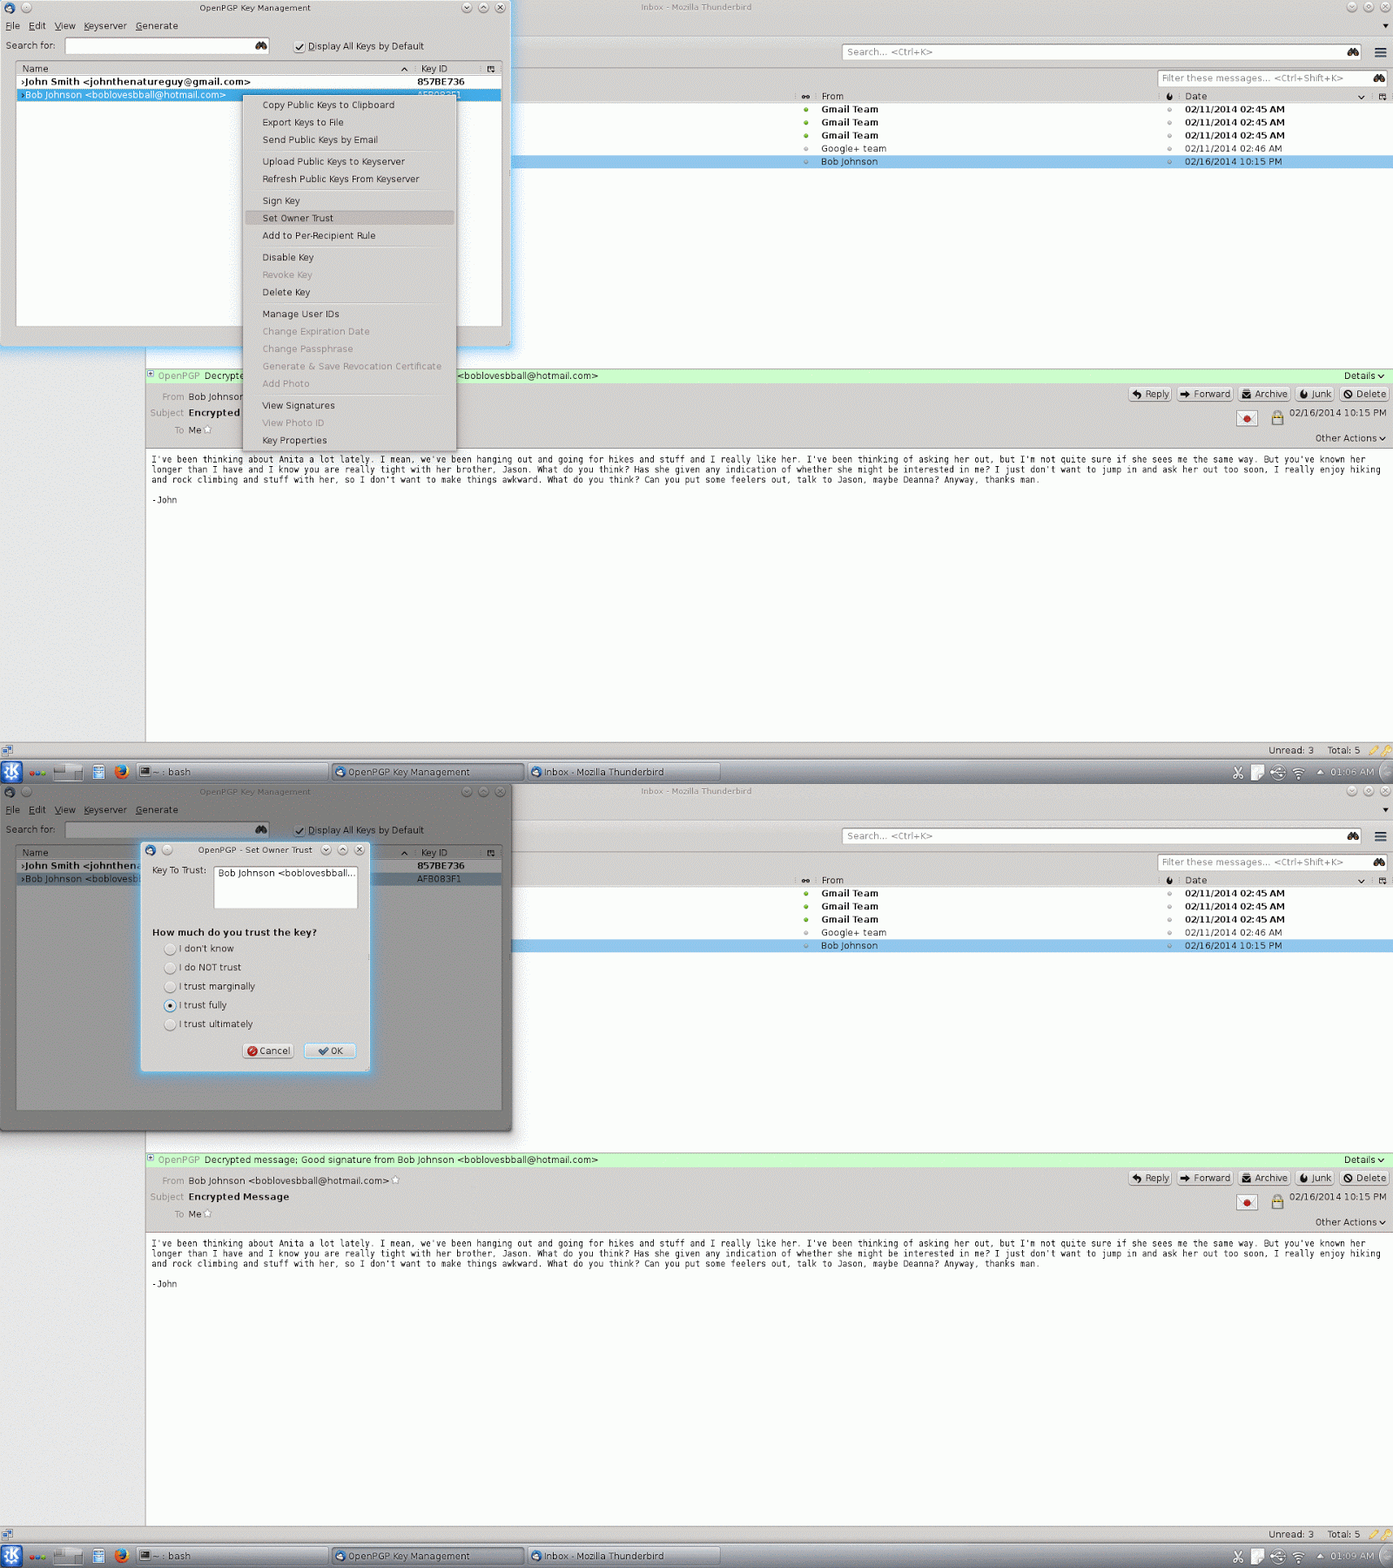
So let's look at how to sign a key with Thunderbird and Enigmail. Again, we will open the OpenPGP Key Management dialog. Now, find the key you've just verified and right-click it, the click "Sign Key". This will pull up a new Sign Key dialog, which will ask how well you have verified this key. Hopefully you have verified it thoroughly. You will also see an option for a local signature. If you choose this option, it will be signed only for your purposes and the signature will never be uploaded to a key server for your friends to see. Again, signing a key may require your password, depending on your settings and when you last entered it, to use your secret key. Once you have signed the key, go to the menu on the OpenPGP Key Management dialog, click "Keyserver" and then "Upload Public Keys". This will upload the signed copy so that next time your friends check, they will see that you have verified and signed the key. You will also notice that once you have signed the key, emails that were signed by that key simply show "Good signature from..." rather than, "UNTRUSTED Good signature from..."
It should probably go without saying that since all of your friends are counting on you, you should only sign a key that you have really properly verified, but I'll say it anyway, just in case. If you are signing a key for someone you do not know well, you should check some form of ID, but remember you are also verifying the email address.
Now to make use of the keys our friends have signed, we need to also indicate which of our friends we trust to verify and sign a key. The setting for this is called Owner Trust. Again, from the OpenPGP Key Management dialog, right-click the key of the person you want to trust to verify and sign other keys, then click "Set Owner Trust". If you set someone as fully trusted you will trust any key they have signed, if you set them as marginally trusted you will only trust keys that have been signed by several other marginally trusted people. By default, GnuPG will only follow a chain of trusted keys for a maximum of five steps, and the number of marginally trusted signatures required for a key to be considered valid is three. These numbers are configurable, but this is not an option in the Enigmail interface and for our purposes I'll just assume the defaults are suitable for most people (the relevant options are
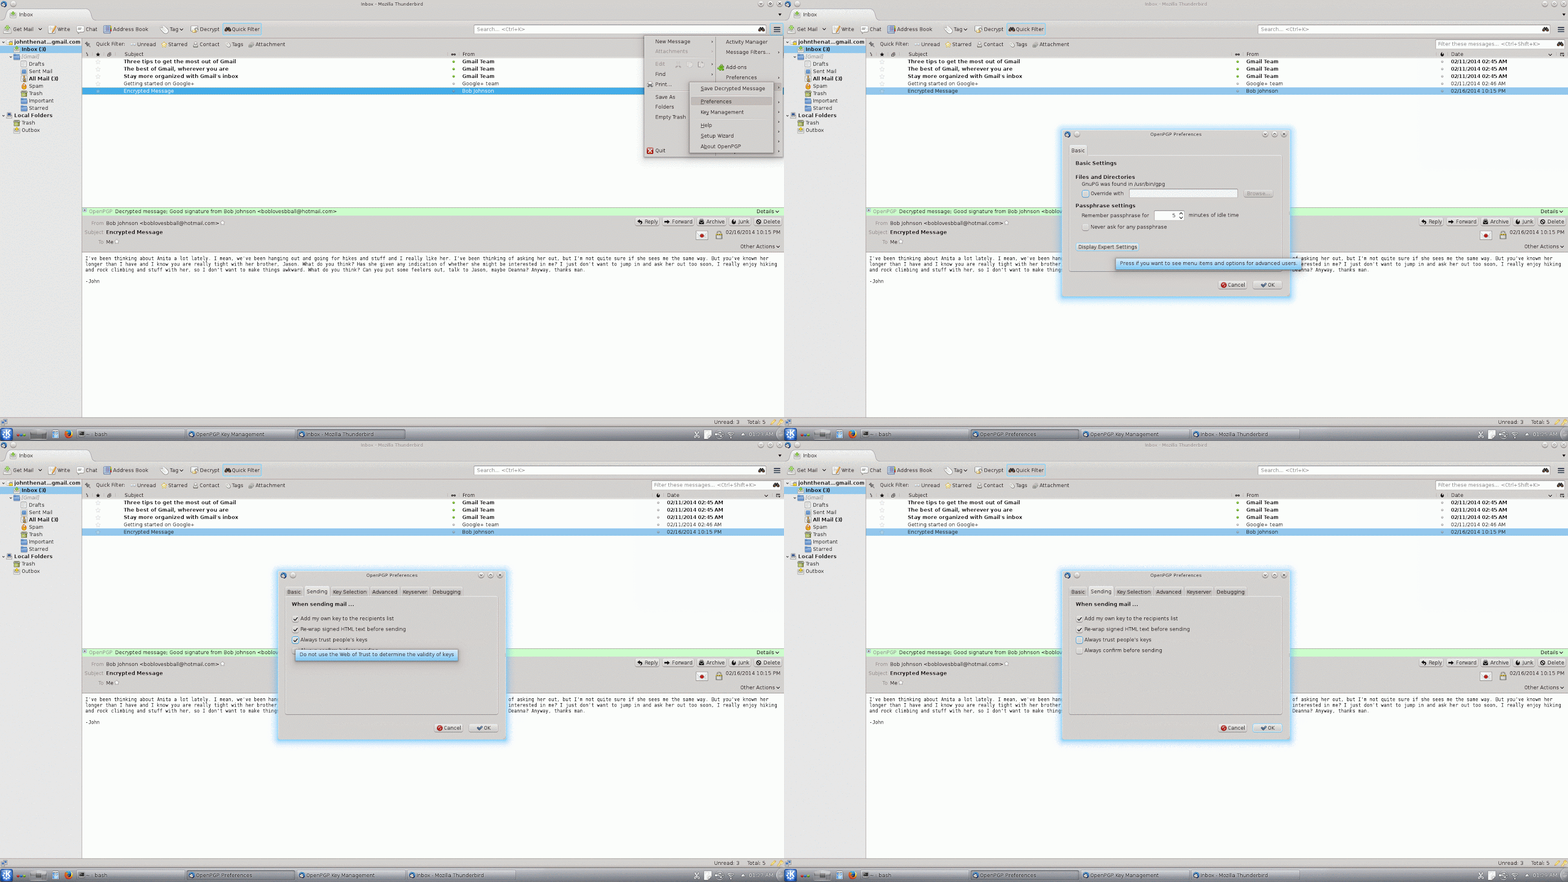
max-cert-depth and marginals-needed if you are interested in changing the gpg configuration directly, though).By default, Enigmail trusts all keys, so if you want to start managing trust manually, you will also probably want to change this setting. This time go to "OpenPGP" on the Thunderbird menu and click "Preferences". In the preferences dialog there is a button that says, "Display Expert Settings", click on this and you will get a series of new tabs to choose from. In this case, click on the "Sending" tab, and then uncheck the box that says,"Always trust people's keys". Once you have done this, Enigmail will no longer use a key for encryption unless it is trusted, because you or someone you trust has signed it.
Synchronizing and Backing Up Your Keys
With our original setup, we can only send or read encrypted email from the one computer we originally set up. If you repeat the process on a second computer, generating a new key, you will have two different keys and mail sent to one can't be read from the other device so this is clearly not a proper solution. Of course, many people will want to use more than one device to read their mail so we are going to see how to do that here, as well as how to backup your keys. Now to be clear, you do not want to put your keys on any machine you don't trust, you should limit this to devices you control and you should take steps to protect them.The easiest way to synchronize your devices so you can use the same keys on both is to copy over GnuPG's configuration folder. On Linux, this is in your home folder
/home/username/.gnupg, on Windows it is %APPDATA%\gnupg which is usually C:\Documents and settings\username\Application data\gnupg\. This folder contains your public and secret keys, as well as they keys of others you have collected and any custom configuration you have made, so once you've installed the necessary software you won't need to worry about generating keys or re-downloading your friends', it will all be there.Similarly, if you make regular backups of your full system, you are already covered. If you only make backups of select files and folders, make sure you include your GnuPG configuration folder. However, if you use a cloud-based backup system, you may want to consider whether you want to trust it with your keys and consider alternatives. Keep in mind that if you loose your secret key, you will lose access to all email encrypted to you with that key, and if your secret key. On the other side, if you allow your secret key to fall into the wrong hands, that person can read any mail encrypted with that key and can also forge new messages appearing to be from you. Everyone should have a strategy for backing up valuable data (especially those things you can't replace, like family photos, etc) but your GnuPG key is particularly important to not only have backed up, but to keep the backups secure as well.


No comments:
Post a Comment